There is perpetual interest in the fabulous treasures and the enduring appeal of the enigmatic rulers. There is still much mystery attached to the pharaoh’s their lives and deaths and in these activities, you’ll encourage the children to piece together what we do know to arrive at a good guess at some of the unanswered questions and how archaeologists arrived at some of the answered ones.

Activity One – How did Tutankhamen Die?
Year 3 to Year 6
Tutankhamen’s body was badly decayed when Howard Carter first undid the bandages that wrapped his body. The decay meant that little could be discovered about why he died but early tests revealed that he was only 18 when he died.
These days with advances in forensic science, a lot more is known about his health and the cause of his death but it doesn’t explain his early demise. By collecting all the known facts about the young pharaoh, the children can act as the police or a forensic scientist a la CSI and come up with their own informed version of events.
LO: To identify and use information that’s relevant to a question
To be able to use evidence to make decisions, justifying them by reference to the relevant information
Talking Point: Show the children an image of the body of Tutankhamen and tell them that he was the pharaoh, or ruler of Egypt from the time he was eight or nine years old until he died aged 18. Explain to them that as he was so young and inexperienced, he ruled with an adviser, likely to have been his uncle.
Ask them if they think his death was from natural causes or whether they think he was murdered. Tell them that they are going to find out all they can about his life and death a little like on a police drama such as CSI and will need to present to the rest of the class how they think he died and how it happened.
Activity: Get the children to work in small groups to use the internet to find out all they can about Tutankhamen’s life and death. There aren’t a lot of facts and he seems to have been quite a mysterious character. What they are likely to discover is that he had problems with his feet, had broken his leg shortly before his death and the wound had become infected and that he suffered from malaria. He also had a head wound.
Once they have all the information they can find they should think about creating a story about his last few days, weeks and months and write up the story referring to the facts they have.
Once the whole class has finished, they should present their findings to the class.
Activity Two: Working With Hieroglyphics
In this activity the children get to work with and translate hieroglyphics following in the footsteps of famous French philologist Champollion who accompanied Napoleon on his archaeological ventures in Egypt.
LO: Be able to use hieroglyphs to write a message and decipher another
Understand how language and ideas can be transmitted using pictures
Talking Point: One of the most amazing stories to come out of ancient Egypt was the finding and translation of the Rosetta Stone. On the first of Napoleon’s campaigns in Egypt, one of his soldiers found the inscribed stone embedded in the wall of Fort Julian. It was dug out but then proved impossible to decipher despite being written in Ancient Greek, Demotic and hieroglyphs.
Year 2 to Year 4
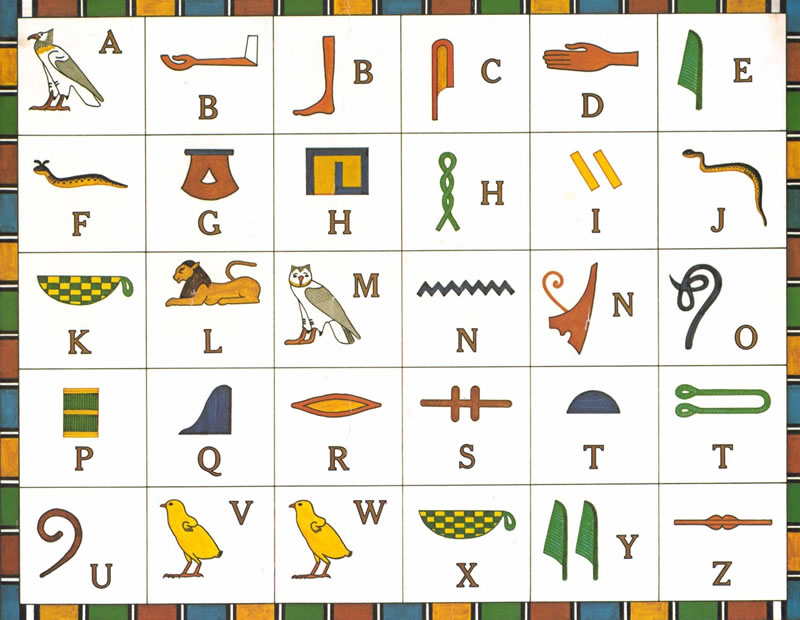
Give the children the chart of Egyptian hieroglyphs that accompanies this activity and ask them to write a simple message using them. They can then pass the message on to friends for them to translate. Tell the children that there aren’t hieroglyphs for all the letters and that some of their words may have missing letters. This adds to the fun and the challenge by making them decide which the missing letters are to make the words.
Year 3 to Year 6
The Rosetta Stone was decoded by comparing the hieroglyphs to the matching Greek word Ptolemy. The translator, Champollion knew the word he was looking for as ruler’s names are written inside a cartouche, almost like a modern day text box. Thus he found the hieroglyphs that matched the letters in Ptolemy and used them to translate the rest of the hieroglyphs and thence the words.
Talking Point: Tell the children the story of how Champollion managed to translate hieroglyphics despite other scholars failing. Explain to them that they are going to devise their own alphabet using symbols and then present a key word in English to match up with a word written using their symbols.
You can use the work sheet that accompanies this activity or create your own.
Activity:
Use the characters on the work sheet to represent letters in the alphabet drawing them carefully under each letter. Now write a message of at least twenty words using the symbols to repeat the message. Translate one of the longer words by writing the English underneath the glyphic word. Now swap with a partner and try to decode the rest of the message. You’ll find many words have missing letters and they’ll need some guesswork, a little like hangman, to work out what the word is.
At Home: It’s fun to design your own hieroglyphic name plates, perhaps for your room or the rooms in the house. Make one on paper stained with tea to make it look like papyrus and perhaps frame it.


