These days we are used to taking photographs with a digital camera and the process seems incredibly quick and simple, but photography dates back 150 years and this month we’re going to ignore the “point and press” nature of modern photography and instead, look at how we can understand the basics of the art and science of photography.
Activity 1 – Using light to create images
Suitable for: Year 3 to Year 6
Learning Focus:
- Be able to understand how light can create images
- Use sugar paper and other papers and card to create images
Take the pupils around the school looking at class displays which have been mounted on sugar paper. If you find somewhere with sunlight falling on the display, you’ll be able to demonstrate how sunlight can help create images.
Carefully peel back the pupil’s work from the backing and, if it’s been there for more than a week, you’ll find that the colour has been maintained where the sugar paper was covered and has faded where it has been exposed to the sun.
You can use this process to create pictures with your pupils.
Give the pupils a piece of strongly coloured sugar paper along with pieces of card, crepe paper, tissue paper and tracing paper. Ask them to cut out shapes from the various papers and, using blue tack or reusable tape, position the shapes on the sugar paper. Overlapping some of them, or removing some before others, will create more intricate designs.
Place the work in a strongly lit area, preferably in the sun, and leave for a week. When the pieces of paper are removed, the pupils will see their design reproduced in many different shades.
You can explain to the pupils that this is a very basic demonstration of how light creates photographs from the different intensities of light that hit the photographic film.
Activity 2: Making images using photosensitive paper
Learning Focus:
- Be able to understand how light can create images
- Use light sensitive paper to create images
You can buy light sensitive paper cheaply online or through education suppliers and it’s a fantastic way of developing pupils’ understanding of the role of light in creating images.
You don’t need to work in a darkroom but cutting out a lot of natural light will help the activity work more effectively.
Ask the pupils to bring in a selection of objects with interesting 2D shapes or ‘footprints’. Leaves, shells, grasses etc. all work well.
In a room where the light has been reduced, ask them to place their objects artistically on the light sensitive paper. Carrying it carefully to a sunny position will see the dark paper turn lighter as the sun hits it. The process only takes minutes in strong sunlight, somewhat longer on cloudy days.
When the pupils are happy with the level of shading, they should immerse the paper, minus the objects, in water which ‘fixes’ the image. They’ll be amazed, for the water turns the light parts dark and the dark parts light.
Activity 3: Making a camera obscura
Learning Focus:
- Be able to understand how light can create images
- Understand that light travels in straight lines
This activity is great fun and fascinates pupils.
They’ll need a small shoe box which must be painted inside with matt black paint and any parts that let in light need to be sealed.
At both ends cut a 1 cm hole; one will be the viewing hole, the other where the image enters.
They’ll need to make a screen from tracing paper that must fit across the inside of the box around 20 cm from the ‘lens’.
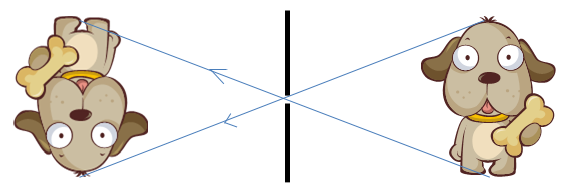
For the ‘lens’, use a piece of thick aluminium foil. Sandwich it tightly between two pieces of card and push a needle through all three layers. This way means you get a clean circular hole and a better image. Carefully glue the piece of aluminium over the 1 cm hole at the lens end. With the screen in place, put the lid on the box and point the ‘lens’ at a brightly lit object and look through the viewing hole at the screen. If the screen is in the right place, the pupils should see a clear but inverted image in colour on the screen. If it’s not clear, try moving closer or further away from the object and try again. If that doesn’t work, adjust the position of the screen. When the pupils are happy with their images, they can permanently attach the lid and seal the camera with duct tape.
The pupils are likely to notice that the image is inverted and you can explain this simply by using the following diagram…

Because light travels in straight lines, passing through a small aperture or lens means that the image inverts as light from the top of an object is projected on the bottom of a screen and vice versa.
You can get the pupils to experiment some more by making the lens hole bigger.
What effect does it have on the image?


