Look at the evidence!
When examining cartoons, pictures or drawings, students often find it difficult to see beyond the obvious, which is usually staring them right in the face. How do you train them to search for all the evidence in the picture? I always remember as a pupil being shown a photograph of Emily Pankhurst, dressed in furs and a swanky coat, walking smiling towards the camera. Why was she smiling? Why dressed up? Where was she going? Pulling back from the close up showed she was being led away by two burly policemen, after breaking windows at a London department store. Who says the camera never lies? Here are a few ideas.
If you have an Interactive White Board the ‘hide’ or ‘highlight’ features are invaluable. Choose your piece of evidence carefully and move the ‘highlight’ around the evidence bit by bit. You can make the highlighted area as large or as small as you wish. Get your students to carefully examine each and every bit of the evidence, explaining clearly what they can see. A variation of this is to use one of the ‘Jigsaw’ types of software freely available on the web. Choose a suitable image and chop it into as many pieces as you wish, then ask students to reassemble it. They will have to look closely at the evidence to do that!
Equally, you can do the same kind of activity on paper, either A3 or A4. Copy your piece of evidence then cut it up into several pieces. Give each group in your class one piece to explore. Ask them to describe what they can see, then suggest what might be in the rest of the evidence. Finally, project the complete image on your board and feed back.
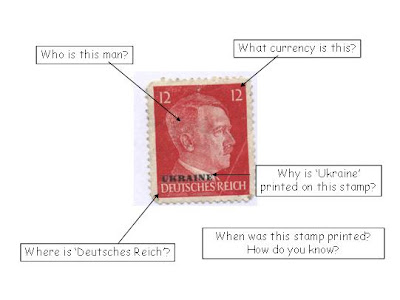
Finally, of course, is our old favourite ‘Powerpoint.’ Project an image, perhaps like this one:
It is instantly recognisable as a German stamp, with the image of Hitler on it. But we can learn so much more from a close scrutiny. Using the ‘arrow’ function and textbox questions, students can be directed to look at very specific parts of the stamp. Add one arrow per ‘Powerpoint’ slide, until finally your slide will look something like this:
They are exploring all of the image, and are then in a position to deduce information from it. The stamp, of course, was overprinted ‘Ukraine’ after the Nazi invasion of Russia, and thus can be clearly dated. It also opens up a discussion on all the ‘normal’ aspects of life that need to be catered for by an invading power!
By carefully choosing the most appropriate images you can easily train your students to look beyond the obvious, and thereby enhance their skill at evidence work. Have fun!
Alf Wilkinson
CPD Manager for the Historical Association and previously National Strategist for Key Stage 3 History. Alf has over 30 years history teaching experience and was lead author for Collins Key Stage 3 History resources.


